Create Web Portal Shares
Web Portal shares can be created in several ways, either manually through the user interface, via SEAL OP-CLI (which is used by the PLOSSYS 4 Web Portal printer) or by directly accessing the Operator REST-API (for example via DPF).
A share has the following settings which can be specified during its creation or by editing. For detailed instructions refer to the following sections.
-
access notifications(optional): If enabled and the email service is configured, notification emails will be sent when access to shares is granted or used.Hint - new notification emails
If you change the expiration date of an expired share with access notifications enabled, new notification emails will be sent to its recipients. If you change the expiration date of a not yet expired share, no emails will be sent.
-
description(optional): Additional description of the share set by its creator or its owner. -
link access(optional): If public access to shares and this option are enabled, users not listed in the OIDC can access the share via the provided link. -
owner(optional): User on which's behalf the share has been created via SEAL OP-CLI or Rest-API. Not usable via user interface. -
share name: Title or subject of the share used in the Web Portal panel and notifications. -
end date(optional): Expiration date of the share. Default is the current date. The share will not be deleted instantly afterwards but can get restored by its owner via the user interface. -
users(optional): Email addresses of users that should get access to the share. These users have to be registered in the OIDC used with SEAL Operator.
Manually
To create a Web Portal Share manually execute the following steps:
-
Log on to the user interface and open a Web Portal Panel.
-
In the
Owned Sharessection click theAdd Sharebutton. -
Enter a name for the share and adjust the expiration date. Default for the expiration date is the current date.
-
Enter the email address of the user who should get access to the share. Confirm it with the
+button. Repeat for each additional user. -
If you disable the
Access notificationcheckbox, neither the assignee will get a notification email about the new share nor you if the share got accessed for the first time.Hint - how to change the notification emails
The templates for the email notifications can be changed in the configuration settings. For detailed instructions, refer to Setup Email Notifications.
-
Click
Createto finish.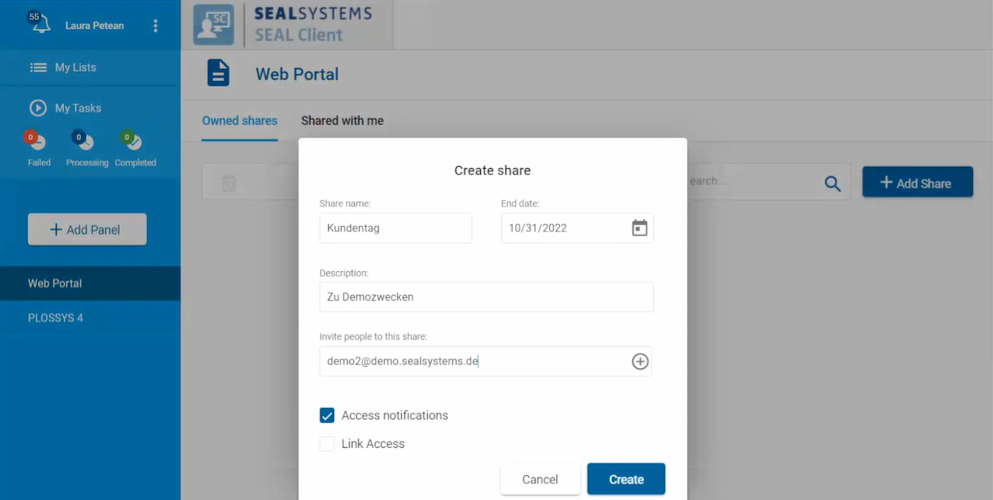

Hint - add users later
At the current state there won't be any further emails sent, when files get added. Therefore, when creating an empty share don't add users yet. First add all the files to share, then add the other users. Otherwise they will get a notification email when the share is still empty and miss the moment when it isn't anymore.
Via a PLOSSYS 4 Printer
In PLOSSYS 4, you can output documents directly to the Web Portal in SEAL Operator. For this, you configure a printer in PLOSSYS 4 via which a Web Portal share will be created containing the output documents. You also have to make changes at the Web Portal Connector.
The following requirements have to be fulfilled:
-
In SEAL Operator, Web Portal is configured, refer to Connect the Web Portal.
-
The
seal.webportalprinter template containingseal.webportal.plas of version 1.20 is available for installing the printer via easyPRIMA or via PLOSSYS 4 directly.
Configure the Connection to the Web Portal
The following settings are configured in the templates in easyPRIMA before distributing the Web Portal printer. When installing the printer in PLOSSYS 4 directly, you have to change the configuration file of the Web Portal printer after the installation.
-
Edit the
seal.webportal.cfgfile in theserver/edc/templates/seal.operator_webportal.pdf_vr_pdfdirectory when using easyPRIMA or in theserver/plotserv/plotterdirectory when the printer has been installed in PLOSSYS 4 directly. -
Specify the following keys in the
[OPERATOR]section:-
OPCLI_AUTH_CLIENT_SECRET(mandatory): secret of command line client -
USER(mandatory): User name of the technical user who has permission to access the SEAL Operator server's REST API and create Web Portal shares -
PASS(mandatory): Password of the technical user; can be clear text or encrypted viasealencrypt -
CONFIRM_ACCESS_MAIL(optional): Should a notification mail be sent when the share got accessed? Default isY. -
PORTAL_TTL(optional): Lifetime of the Web Portal share; default are 10 days (10d).
-
Example - operator section of template seal.operator_webportal.pdf_vr_pdf
[OPERATOR]
#OPCLI_AUTH_CLIENT_SECRET = <secret of command line client>
#USER = <name of technical Operator user>
#PASS = <password of technical Operator user>
CONFIRM_ACCESS_MAIL = Y
PORTAL_TTL = 10d
Create and Configure the Web Portal Printer
-
Create a Web Portal printer using the
seal.webportalprinter template. -
With the Web Portal printer, set the
QUEUEparameter toOPERATOR/<default_owner>/<operator_server_url>where-
<default_owner>is the user name of the default owner of the Web Portal share. The owner is the user on who's behalf the share will be created. -
<operator_server_url>is the URL of the SEAL Operator server's REST API. Normally, this ishttps://<operator_server_name>:3008.
Example -
QUEUEparameterIf the default creator is John Doe with user name
john.doethe queue parameter would beOPERATOR/john.doe/https://opsrv:3008If the default creator is John Doe with user nametestthe queue parameter would beOPERATOR/test/https://opsrv:3008 -
Install SEAL OP-CLI
The PLOSSYS 4 Web Portal printer uses the SEAL Operator command line tool, SEAL OP-CLI, for creating the Web Portal shares. Therefore, you have to install SEAL OP-CLI version 5.13.0 or higher on the PLOSSYS 4 server. For how to do this, refer to the SEAL OP-CLI documentation.
Configure the Connector
Set the required permissions for the OIDC clients seal-print-client, seal-opcli, and seal-webportal:
Hint - generate a template
You can use SEAL Operator CLI to generate a template for ALLOWED_OIDC_CLIENTS:
operator config template ALLOWED_OIDC_CLIENTS --file template.json
operator config set ALLOWED_OIDC_CLIENTS --file changed_template.json
-
Open a Command Prompt or PowerShell.
-
Export the complete configuration of SEAL Operator from Consul to a YAML file with the following command. So you're making sure the current configuration settings are being used.
operator config export <filename>.yml --insecure -
Edit the exported file
<filename>.yml. -
In the
envsection, specify the keyALLOWED_OIDC_CLIENTSforanyservice:{ "seal-print-client": { "roles": { "seal-print-client-user": {}, "techuser": { "areas": { "documents": { "set-impersonate": { "views": ["ALL"], "permissions": ["impersonate"] } }, "tasks": { "set-impersonate": { "views": ["ALL"], "permissions": ["impersonate"] } }, "panels": { "set-impersonate": { "views": ["ALL"], "permissions": ["impersonate"] } } } } } }, "seal-opcli": { "roles": { "seal-print-client-user": {}, "techuser": { "areas": { "documents": { "set-impersonate": { "views": ["ALL"], "permissions": ["impersonate"] } }, "tasks": { "set-impersonate": { "views": ["ALL"], "permissions": ["impersonate"] } }, "panels": { "set-impersonate": { "views": ["ALL"], "permissions": ["impersonate"] } }, "shares": { "set-impersonate": { "views": ["ALL"], "permissions": ["impersonate"] } } } } } }, "seal-webportal": { "roles": { "service-account": {} } } } -
Save the
<filename>.ymlfile and re-import it to Consul.operator config import <filename>.yml --insecure
Literature
For the description of possible keys and values for ALLOWED_OIDC_CLIENTS, refer to Available Keys and Values.
Specify PLOSSYS 4 Job Parameters
The following job parameters affect the creation of the Web Portal share via the Web Portal printer:
-
PLS_PLOTID(mandatory): Name of the share if it's a single print job. -
PLS_RECEIVER(mandatory): E-mail addresses of users the Web Portal share will be shared with; the addresses are separated by blanks. -
PLS_SENDER(optional): The name of the user on who's behalf the Web Portal share will be created; default is the owner specified in theQUEUEparameter. -
PLS_SET_NAME(optional): Name of the share if the print job is a set collation. -
PLS_SUBJECT(optional): The description for the Web Portal share.
Expiration date and access notification of a share depend on Web Portal configuration values and can't be set individually for each job.
Via REST API
You can use the API to create Web Portal shares. When outputting order data from SAP it might be required to automatically create subfolders within the share. The example below shows how to do that.
Example
#!/bin/bash
AUTH_ISSUER_URL=https://localhost:32769/auth/realms/SEAL
# get OIDC token from IDP
IDP_CFG=$(curl -k -s "$AUTH_ISSUER_URL/.well-known/openid-configuration")
#echo $IDP_CFG
TOK_END=$(echo $IDP_CFG | jq -r '.token_endpoint')
#echo $TOK_END
TOK_SET=$(curl -k -s -X POST -d "grant_type=password&client_id=seal-opcli&client_secret=ef5991b8-74a0-4d82-94d9-2221c3c83efc&username=seal-admin&password=test" $TOK_END)
#echo $TOK_SET
TOK=$(echo $TOK_SET | jq -r '.access_token')
#echo $TOK
AUTH="Authorization: Bearer $TOK"
JSON="Content-Type:application/json"

# create share
BODY='{"name":"my-share","metadata":{"description":"ruru","sharedWith":["duli@fu.de"],"expirationDate":1234567890}}'
RES=$(curl -k -s -X POST -H "$AUTH" -H "$JSON" -d "$BODY" "https://localhost:3008/v1/services/operator-webportal/repo")
DOCID=$(echo $RES | jq -r '.uuid')
SHAREHREF=$(echo $RES | jq -r '.links.self.href')
echo ""
echo "Created share with href: $SHAREHREF"
#echo "$RES"
echo "-----------------------------------------------"

# add recipient to share
BODY='{"name":"my-share","metadata":{"sharedWith":["duli@fu.de","duuuuli@fu.de"]}}'
RES=$(curl -k -s -X PATCH -H "$AUTH" -H "$JSON" -d "$BODY" "https://localhost:3008$SHAREHREF")
#echo "$RES"
echo "-----------------------------------------------"

# add collection to share
BODY='{"name":"coll-1","type":"collection"}'
RES=$(curl -k -s -X POST -H "$AUTH" -H "$JSON" -d "$BODY" "https://localhost:3008$SHAREHREF")
DOCID=$(echo $RES | jq -r '.uuid')
COLL1HREF=$(echo $RES | jq -r '.links.self.href')
echo ""
echo "Created collection with href: $COLL1HREF"
#echo "$RES"
echo "-----------------------------------------------"

# add collection to collection
BODY='{"name":"coll-2.1","type":"collection"}'
RES=$(curl -k -s -X POST -H "$AUTH" -H "$JSON" -d "$BODY" "https://localhost:3008$COLL1HREF")
DOCID=$(echo $RES | jq -r '.uuid')
COLL21HREF=$(echo $RES | jq -r '.links.self.href')
echo ""
echo "Created collection with href: $COLL21HREF"
#echo "$RES"
echo "-----------------------------------------------"

# add document to collection
BODY='{"name":"doc-2.1","type":"document"}'
RES=$(curl -k -s -X POST -H "$AUTH" -H "$JSON" -d "$BODY" "https://localhost:3008$COLL21HREF")
DOCID=$(echo $RES | jq -r '.uuid')
DOC21HREF=$(echo $RES | jq -r '.links.self.href')
echo ""
echo "Created document with href: $DOC21HREF"
#echo "$RES"
echo "-----------------------------------------------"

# add content to document
RES=$(curl -k -s -X PUT -H "$AUTH" -H "Content-Type: application/octet-stream" --data-binary "@/home/vagrant/Downloads/dina4-1.pdf" "https://localhost:3008${DOC21HREF}/content")
echo ""
echo "Content added to document"
echo "------------------------------------------------"

# add collection to collection
BODY='{"name":"coll-2.2","type":"collection"}'
RES=$(curl -k -s -X POST -H "$AUTH" -H "$JSON" -d "$BODY" "https://localhost:3008$COLL1HREF")
DOCID=$(echo $RES | jq -r '.uuid')
COLL22HREF=$(echo $RES | jq -r '.links.self.href')
echo ""
echo "Created collection with href: $COLL22HREF"
#echo "$RES"
echo "-----------------------------------------------"

# add document to collection
BODY='{"name":"doc-2.2","type":"document"}'
RES=$(curl -k -s -X POST -H "$AUTH" -H "$JSON" -d "$BODY" "https://localhost:3008$COLL22HREF")
DOCID=$(echo $RES | jq -r '.uuid')
DOC22HREF=$(echo $RES | jq -r '.links.self.href')
echo ""
echo "Created document with href: $DOC22HREF"
#echo "$RES"
echo "-----------------------------------------------"

# add content to document
RES=$(curl -k -s -X PUT -H "$AUTH" -H "Content-Type: application/octet-stream" --data-binary "@/home/vagrant/Downloads/dina4-1.pdf" "https://localhost:3008${DOC22HREF}/content")
echo ""
echo "Content added to document"
echo "------------------------------------------------"

# search documents
RES=$(curl -k -s -H "$AUTH" -H "$JSON" "https://localhost:3008/v1/services/operator-webportal/repo?metadata.description=ruru")
echo ""
echo "$RES"
echo "-----------------------------------------------"
Literature - API description
For more information about the REST API interface, refer to API Description.